Showing posts with label Cards. Show all posts

Saturday, August 29, 2020

Better With Friends Card

 Hello Crafters!

I wanted to share with you, this card I created with the tea/coffee cup design.


The cup was printed on glossy photo paper. Yes, I know..... I need to work on my blending :o) 

I used Spectrum Noir alcohol markers, then cut the image out.

The background is some board shelf lining paper and a scan of lace on a pillow case.

The edges and tag were inked with Ranger's Antique Linen. 

The sentiment was printed onto beige paper, a tag punch was used, inked and adhered with a mini brad. 

It's all mounted on A4 white cardstock. 

Thank you so much for stopping by the Coffee Bean Design Team Blog.

Have a fabulous day!

Craft on,

Becky

Monday, June 29, 2020

Good Luck Best Wishes

 For my last card of this month I chose to bling it up. This card was so much fun to make. The horseshoe is a Digi file designed by Anne Ingram and can be found in Lady Beans Etsy Shop.  I used Nuvo glue pen and Nuvo Pure Sheen Glitter in steel gray. The flower is a cut out from a previous Stampin Up Paper Pumpkin pack. Sentiment is The Ton Easy Expressions. Card stock is Soft Suede and Wood Texture Designer series paper from Stampin Up.  The Peel off Sticker strips are from Love From Lizzy in Pink Glitter and Silver. Hope you like bling!  


Tuesday, May 26, 2020

A little bit Outlandish

Hello all - Helle here with a new card project for the Coffee Beans Design Team.

This time I've done it a bit differently meaning that instead of coloring in a digi stamp, I've used the print and cut option in my Silhouette Studio Software. It's a bit more of a lazy approach but if you - like me - aren't the best with markers or crayons, it's a great alternative.

This time I used digi stamps made by our own Anne Ingram and Annie Collins. These stamps are available in the Lady Beans Etsy Store

I originally intended this to be a bridal project but when searching for digi paper to use, I came across this lovely paper by Lettering Delights - A Wee Bit Scottish and this of course refers to the TV series Outlander.

So this is what I came up with:

I pictured these to be Claire's shoes ;-)

The shoes are by Anne and the flowers are by Annie. 

I did use a Promarker for the center of the flowers + a Gelly Roll Pen with glitter.

The background is made with digi paper and a Celtic Knot Motif from the Silhouette Design Store ID #57808.

Finally I added a small sentiment written with a Celtic font.


I think it rather fun that you can use this method too. What do you think? Please let me know in a comment below.

Thanks for joining me today - hope to see you back here very soon.


Saturday, May 23, 2020

Everyone Knows How Much I Love Glitter

Hello all. Salima here with Judy Markowitz's infamous Alicorn.  Isn't he just beautiful.  I used rainbow colored Stampin Blends to color his main in the colors: Real Red, Pumpkin Pie, Mango Melody, Shaded Spruce, Seaside Spray and Blackberry Bliss.  His unicorn and front bangs are all glittered up with Nuvo Pure Sheen glitter: Glitter Diamond and Glitter Champagne. I cut a couple of curves in some scrap paper and used that to represent clouds with Impression Obsessions Rose colored hybrid dye ink.  Gold mirror paper is the matting for our image. Sentiment is from The Ton stamp set called Easy Expressions layered on Gold Mirror paper.  You know the shine from the glitter was not enough. I took my Spectrum Noir Sparkle marker and went over the main of Alicorn to make him shine just a little bit more. They don't call me the Glitter Queen for nothing! 
You can find Judy's Alicorn Digi Stamp here
Thank you for visiting. 


Tuesday, May 19, 2020

Pink Perfume


Hello all!

I am back with another craftroom Creation featuring Coffee Bean Design digital stamps, For my cards today I played with the perfume jars collection.


To start off you'll need to print your images out I recommend on card stock, I used 80 pound white card stock but you can use whatever you have. I find coloring relaxing so 
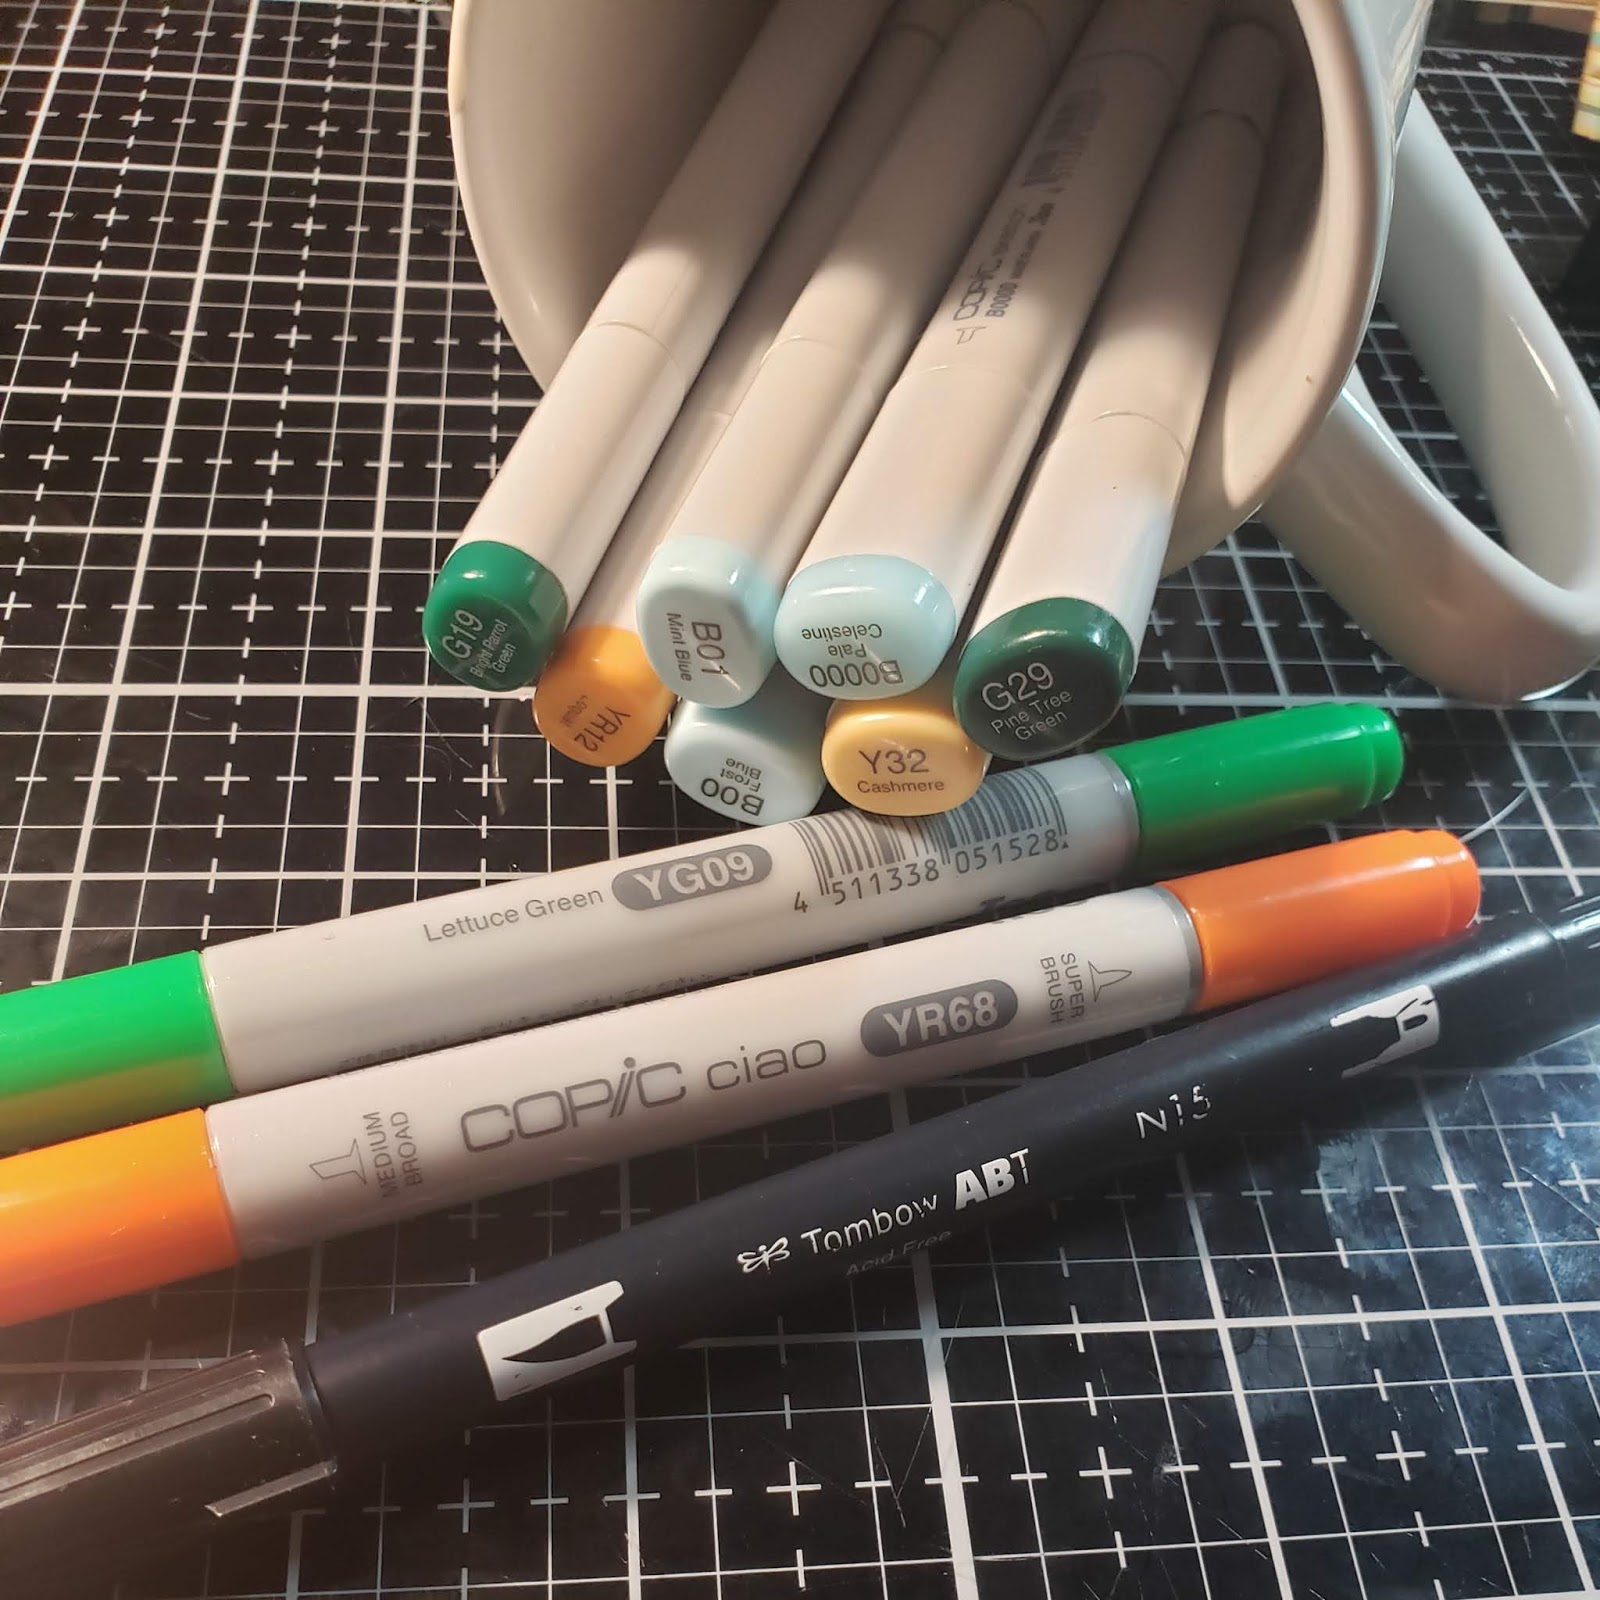
I choose to use my Copic markers to color in these images. I am working on improving my pink blends (RV/R) since I struggle with them a bit and practice makes progress.

Heart Jar: RV11, R83, R85, RV34, R59, W1, W3, W5
Tear Drop Jar: RV02, RV04, RV06, RV19, N2, N5,C7 C9

I find with the RV/R color family I need to use more colors to get the blend I want. I tried 3 and 4 marker blends and they work but I wasn't getting the depth I wanted. I added another marker to my blends and got much better dimension. I notice with the RV/R color family the lighter colors pick up  more of the darker color than with other color families. When coloring I went lightest to darkest then back out but didn't color over the previous area just blended out the edge. After my images were all colored I added details with my white gel pen and a small “kisses” stamp.


These images are easy to fussy cut out but even if it's not perfect just run a water based black marker along the edge to cover the white core of the paper and it will look perfect.


If you are anything like me you have plenty of pattern paper hanging out in you craftspace, so use it! I pulled out scraps from the “Me and You” collection by “Me And My Big Ideas” to created 3 cards, you can find the bonus card over on my blog. I cut my scraps down to make layers for an A2 card (4 ¼ by 5 ½ inches) and uses foam tape to pop up my colored jars. Once I had the placement for my heart jar I colored in a shadow on the pattern paper to ground it.

Using digital stamps along with pattern paper scraps is a great way to make easy beautiful cards. I hope you enjoyed these cards. If you want see more of my craft room creation you can follow me on social media @TheCraftBean.

Happy Crafting
Brandi M.
The Craft Bean


Sunday, May 10, 2020

May Flowers


Hello Coffee Bean Design fans!

My name is Brandi M. aka The Craft Bean and I have a couple craftroom creation to share with you. I got a chance to play with the super sweet daffodil digital stamp by Coffee Bean Designs.


I started out by printing the images on card stock I used a 80 pound card stock but you can use any card stock that works with your printer.

I love coloring and as soon as I saw these floral images my Copic makers called to me. I also think these are beautiful when water colored. You can check out my blog to see that. I used 3 color blends, coloring from lightest to darkest then back to get an even blend.


Copic Marker Combs:
Jar: B01, B00, B0000 Leaves:G19, G29, YG09 Flowers: YR68, YR12, Y32


Since I had two images colored I decide to make two card. I cut one piece of 8 ½ by 11 craft card stock in half to get two A2 card base (4 ¼ by 5 ½) For the first card I trimmed the flowers in the jar down (2 7/8 by 4 3/8) and matted it on yellow card stock and adding a “Hello Friend” sentiment for an older Tim Holtz set. Then went digging through my scrap bin and found a plaid pattern paper that coordinated with my color pallet. I trimmed my scrap down to 2 by 5 ½ inked the edges with brushed corduroy Distress Ink. I adhered my plaid paper along the edge of the card and then used fun foam to pop up my focal point.


For my second card I fussy cut the floral image and inked the edges with a black water base maker to pretend I cut it out perfectly. I used more of the plaid paper along the bottom 3rd of the card to ground my flowers and stamped “Thinking of You” from another Tim Holtz set. For my focal point I added foam tape to the back of the flower and Tombow glue to the steams to add more depth to this simple card.

Thank you for letting me share my craftroom creations with you all! I will be back soon with more to share. If you just can't wait you can head over to my blog for a bonus card. If you are inspired to create to create with this or another Coffee Bean Designs you can find them here. You can also find me all over social media @TheCraftBean.
Happy Crafting!

Brandi M.
The Craft Bean

Sunday, May 03, 2020

Over the rainbow

Well not quite - more like over the music or ?

No I'm not entirely rambling. I'm referring to the latest project I just made using these cute stamps made by Judy Markowitz of the Lady Beans - both are available for purchase in the Multi Crafters Craft Cafe on Facebook.


I didn't have much time to make the project so I settled on making a card and combined the two stamps and the result is this:

I colored in the stamps with Promarkers and Sharpies and used a Glitter Gelly Roll on the hair in between the colors plus as dots in the eye. Then I added some colorful enamel dots here and there.

This will be perfect as a Birthday card for a little girl who loves unicorns.

Thanks for watching - as always, please leave me a comment below.


Sunday, April 12, 2020

Mom's Day!

Hello everyone! I am back! I took a little hiatus.  As you all know, Mom's day is on the horizon.  The tulips were are a special image from Anne Ingram. I printed them and had my Scan N Cut do the work of cutting the images out.  The tulips were colored with my Stampin Up Stampin Blends Markers. Mom stamp is from the stamp set Mom's Clematis from Simon Says Stamps.  The background is designer series paper from Stampin Up and the bees are from Stampin Up's Paper Pumpkin from January 2020 "I'll Bee Yours".  Of course Salima has to bling, so I added a little embossing powder Brutus Monroe called Spring Sparkle and a little bling to the head of the bees.  Hope you enjoy this beautiful card

Wednesday, March 11, 2020

And We Have Lift Off! Coffee Beans March 2020


Welcome Back Friends,

Robin here with The Coffee Beans sharing a card featuring this most adorable bunny, flying high in the sky in a hot air balloon for Easter! Thanks to our awesome sponsor Bugaboo Stamps for this fun image!


I colored my image using colored pencils, pop dotted him over the ribbon and two bright mats. Rounded the corners, added a butterfly and sequins to complete my card.

Thank You for visiting and as always I appreciate your kind comments.

Until Next Time...

Robin

Thursday, January 30, 2020


Another card made for the The Coffee Beans blog today.  This dolphin Digi file is so adorable.  It looks like it is coming out of the water to say hi to you.  Background paper is blue with waves added to white card stock.  This Digi file is another of our beautiful Anne Ingram's creations.  I colored this cutie with Stampin Up's Stampin Blends in Smoky Slate.  The sentiment is encouraging you to just be yourself. You will be able to find this cutie pie in the Multi Crafters Cafe in the album.  Make sure you dance to your own tune.  

Monday, January 27, 2020

Hello everyone. A Valentine's card made for that special mate in your life especially for The Coffee Beans blog page.  Simple but effective in letting that someone know he has the mast to the boat that drives you.  
Inside the card, is adorned with a beautiful sentiment requesting his presence.  This Digi file is from our lovely Anne Ingram and you can find the file in The Multi Crafters Craft Cafe in the album. Behind the boat is some designer paper just to make the card pop and I added the same paper inside the card under the sentiment.  There are some enamel hearts in the same colors.  

Sunday, January 05, 2020

Year of The Rat 2020

After being MIA, I have returned to The Coffee Beans blog. According to Chinese philosophy, the rat is considered to be signs of wealth and prosperity.  The year 2020 is The Year of the Rat according to the Chinese.  With the help of digi files from Janet van lone trieschman of V-studios, I was able to create this card.
I printed the digi images on Whisper White card stock from Stampin Up and colored them in with Stampin Blend markers in Light and Dark Calypso Coral, Light Rococo Rose, Light Smoky Slate, and Dark Basic Black. I then glued Nuvo Pure Sheen Glitter in Diamond on top of the rat and the words. The images were backed on Basic Black cardstock from Stampin Up and then Gold Glimmer Paper from Stampin Up.  Whisper White card stock base with Basic Black matting gives the images an extra pop. 
After making this card, I looked at the other images on this digi file and used them on other cards.  

Thank you for joining me again after my hiatus.  See you in the next blog post.

Thursday, December 05, 2019

LemonyFizz - Waiting for Santa Claus


Hi friends! Maria Pilar here with a special card. We are approaching December and today I bring a Christmas card for The Coffee Beans using LemonyFizz files. 

On the white card of my card, I pasted a Christmas paper from Graphic45 that is stamped with a snowball. On it I pasted my image of Santa Claus with the tree with double-sided tape. Then I added white glitter on Santa's hat to give it dimension.
At the bottom I stamped a stamp of Crackerbox&SuzyStamps. A few drops of Stickles and Liquid Pearl adorn the balls of the tree.

You can see more details in my blog by clicking HERE
I invite you to visit The Coffee Beans blog to see the creations of my teammates.
Do not forget to stop by the Etsy store of RodhaDesignStudio.

Sunday, December 01, 2019

From Our Home to Yours

     A day late and a dollar short.... No not really. Sorry everyone I have been a bit under the weather and was not able to post my blog in time. On the Design Team for The Coffee Beans, I made a card using this Digi file from Rhoda Design Studio.  Used Stampin Blends in Dark Cherry Cobler, Dark Real Red, Dark and Light Shaded Spruce, Light Pink Pirouette, and Dark Mango Melody to color this cute little Santa.  Background was with Distress Oxide inks in Tumbled Glass, Broken China, and Mermaid Lagoon.  Santa's hat and beard have glitter on them because Salima has to have some bling on my projects.  I used white craft ink and Versamark to stamp snowflakes in the background. I then used Iridescent Embossing Powder to stamp the falling snow.  Sentiment is from Neat and Tangled set called Bright Baubles.  Hope you enjoyed this cute little card.  


Thursday, November 21, 2019

LemonyFizz - Reinder


Hi all! Maria Pilar here with a new card. We are approaching December and today I bring a Christmas card for The Coffee Beans using LemonyFizz files. 

I made a background with Christmas washitapes placing the strips diagonally and then pasted a piece of vegetable paper on top. That allows me to make the colors softer and to be perceived through the vegetable.
Then I colored my image with Copics and pasted it with double-sided tape on two strips of washitape with snowflakes and a Christmas town.

More details in my blog by clicking HERE. I invite you to visit The Coffee Beans blog to see the creations of my teammates.
Do not forget to stop by the Etsy store of RodhaDesignStudio.
See you soon!

Tuesday, November 05, 2019

LemonyFizz - Cup of Coffee

Hi everybody!
Maria Pilar here with a new job for The Coffee Beans using LemonyFizz files. There are two options and I have chosen the cup of coffee with the daisy flower.
With a large corner die I cut a cardboard in orange, one of the identifiers of the autumn to put it on top of the white base of the card. Above I pasted a doily that is the rest of a die that I did a long time ago. You know that I like to save everything. The image is colored with Copics markers and glued with double-sided tape. To finish the decoration I glued brown sequins and stamped on the doily the message that is from an old Spanish collection of Crackerbox&SuzyStamps.

More details in my blog by clicking HERE. I invite you to visit The Coffee Beans blog to see the beautiful creations of my teammates.
Don't forget to stop by the Etsy store of RodhaDesignStudio.
See you soon!

Wednesday, October 30, 2019

Cute Lil Masculine Card

       Hi, Salima here representing The Coffee Beans Blog for The Lemony Fizz and its amazing digital files.  This specific file has 2 coffee cups to choose from. One with a mustache and the other with a daisy. I chose the one with a mustache to make a masculine card.  The sentiment is from Unity Stamps Enjoyed Together set which was heat embossed in penny embossing powder from Brutus Monroe onto Wood Texture Designer Series Paper from Stampin Up (no longer available) measuring 4 by 5 and a quarter. This was placed on an A2 size card base in Very Vanilla card stock from Stampin Up.
     The coffee cup was stamped on Stampin Up's Whisper White card stock. I colored the card using Stampin Up's Stampin Blends in Blackberry Bliss, Bronze, and Gray Granite and then fussy cut it out.  I stamped the card a second time and colored and cut the mustache separately. Attached that to the front of the cup with Stampin Dimensionals to accent it. The cup was then attached to the front of the card at an angle.  Adhesive-backed sequins from Stampin Up and Wink of Stella used to bling up my card, cause you know the Glitter Queen needs her bling! Enjoy your most important moments together with that special man in your life whether he be your son, brother, father, grandfather, or significant other or anyone else who is special in your life. And don't forget the coffee.

Saturday, September 21, 2019

Everyone knows I love my bling, but very few are aware of my sarcasm

Good evening everyone. Thank you The Coffee Beans for allowing me to be a part of your design team. And thank you The Cutting Cafe for sponsoring The Coffee Beans. I am known as the glitter queen by many of my friends and followers. However, I am known by a choice few of how sarcastic I can really be. I am really not a great fan of coffee.  In fact, I cannot even allow myself to swallow it.  That being said when I looked at the sentiments by Coffee Beans cut files, I had to chuckle.  I found the best coffee cup stamp from Unity Stamps Enjoyed Together set. The person standing beside the coffee cup looks very smug as if to say she is all that and a bag of chips... or should I say a bag of chocolate-covered coffee beans. I heat embossed her in Gilded embossing powder from Brutus Monroe on Very Vanilla card stock from Stampin Up and watercolored the stamped image.  I cut out the image and layered it on Gold Shimmery paper from Tonic Studios.  The card base is also Very Vanilla.  The Coffee cut file is part of The Cutting Cafe cut files which I used my Scan N Cut in black card stock.  That was glued in place in the center of the card. The sentiment which is my standing point is I love you Like I love Coffee.... To the unknown, everyone would say Awww she loves you so much... But this is saying just the opposite with a self-satisfied look. You can find the file for Coffee Word Shaped card by clicking on Coffee


Tuesday, September 17, 2019

The Cutting Cafe - Coffee Word


This week has started a new blog of challenges. It's called The Coffee Beans and today I begin my participation as a member of the design team with this file from The Cutting Cafe, our sponsor this month. It's called Word shaped card and you can find it HERE.