Showing posts with label The Coffee Machine Stamping Machine. Show all posts

Sunday, May 31, 2020

Had To Make the Daffodils Again

Good afternoon every one.  I loved these daffodils so much that I had to make another card.  The sentiment is from Sassy and Crafty Healing Heroes free digital printable.  The Digi file for the daffodils can be found the Multi Crafter's Cafe Facebook page.  This card was made to bring cheer to someone who is working hard at smiling. During this pandemic, everyone is being affected. Whether they are dealing with having to stay at home with no source of income of are front line workers and are worried they may bring disease home to their loved ones. Everyone is worried and this is leading to more illness due to stress.  
Thank you for visiting my blog today 

Tuesday, May 26, 2020

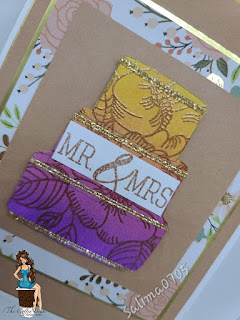
Wedding Season Is Upon Us

The more elegant the wedding, the more elegant the cake.  This Digi file from Anne Ingram was sponged in Tim Holtz Distress Oxide Wilted Violet, Picked Raspberry, and Wild Honey Inks. The design on the cake is an image from Simon Says Stamp's Thankful Flowers stamp set, heat embossed in Caramel Cosmic Semi Transparent Embossing Powder from Sparkle and Sprinkle. Glitter Peel Off Stickers from Love from Lizi.  Sentiment from Simon Says Stamp's Congratulations stamp set, heat embossed in the same Caramel embossing powder.  The mats are gold mirror, peach colored, and designer card stock on top of Whisper White A2 card base.  Had a lot of fun making this card.  


Friday, March 27, 2020

Fresh and Springy Tulips Altered Paint Brush


Welcome Back Friends,

Robin here with The Coffee Beans sharing a fresh and springy altered paintbrush. I used the beautiful Tulips digi stamp from our own Annie Collins which can be found on the Facebook Page The Multi Crafters Craft Cafe, go to photos, click albums, look for The Coffee Bean Stamp Machine, scroll till see the tulip set.


Supplies: Paintbrush, old and painty or a new one that can be painted up.
                Paint of your choice
                Foam brush
                Lace, ephemera, embellishments, digi image, ribbon
                Hot glue gun

What I did: I painted my new brush, here and there. I painted the bristle of the brush to match, just the top layer and then along the bottom of the bristles.

Using a heat gun, I dried the brush top and sides. I then carefully hit the bristles with heat which then caused the bristle to melt and shrink a bit, making it looked like it had been used.

Then taking care I scrap paint off  here and then further adding to the used look.

I then colored my tulips using an eye make up applicator and distress oxide ink, starting at the bottom and blending up.

Using the glue gun I adhered the lace, arranged the tulips gluing down, added the ephemera, the ribbon for the hanger and there you have it!

Thank You for visiting and as always I appreciate your kind comments.

Until Next Time......

Robin

Tuesday, March 03, 2020

Bunny on Cloud Nine

Hello everyone - My name is Helle Bilde Müller of My Creative Hideout and I'm a new member on the Coffee Beans Design Team. I am very excited to be here and hope to bring something new and fresh to the team if possible.

Today I want to start out with not one…..not two…..but three projects I made with the darling digi stamp Easter Bunny Hot Air Balloon from Bugaboo Stamps.
For all three projects I used the trace and the offset options in my Silhouette Studio software and print and cut the images. Then I colored them in by hand.

First of is a cute 3D picture:
This cute picture is one I found in the Silhouette Design Store design ID #141563
I simply switched out the ballon with the digi stamp that I've colored in with Promarkers.

The frame is given extra dimension by using foam tape and the bunny plus the little piece of cloud is secured with 3D dots.

Next is an Easel Card:
This card is also one I found in the Silhouette Design Store Design ID #57245

The background is a print and cut that fits so well with the stamp.

I colored in the stamp with Sharpies and pop-dotted a small cloud on the right. 

A very easy and fun little card for someone special.

Finally I made a Gift Card Gift Bag:
This is also a Silhouette Design Store fil - Design ID #162508

This little bag is also dimensional as the bunny kinda floats inside in a little scene. Candy can be put in there too for more fun. Behind the bunny is a little insert/pocket for a gift card. The little cloud on the outside of the bag, is adhered with a pop-dot.

This time I also used Promarkers to color in the bunny and I do find these easier to work with.

So these are my three projects using the same digi stamp. 

This is deff some what out of my usual way of papercrafting but I do love a challenge. What do you think? Which one is your favorite?

Thank you so much for joining me today - hope to see you again next time 

Thursday, February 13, 2020

Will You Be My First Mate Card

Hello Crafty Friends - I am here with Valentine's Day Card using the
 All at Sea with Love digital stamp set. 
This cute little rowboat was designed by Anne Ingram.

The All at Sea with Love digital stamp set can be purchase via 
The Coffee Bean Stamping Machine located in 
the Facebook group Multi Crafters Craft Cafe
Click photos, albums. Coffee Bean Stamping Machine

All at Sea with Love digital stamp set.

This is the card I created using the All at Sea with Love digital stamp set.
Materials Used:
The Coffee Bean Stamping Machine: All at Sea with Love digital stamp set
Distress Ink: Seedless Preserves
Distress Ink: Tumbles Glass
Distress Ink: Salty Ocean
Distress Ink: Fossilized Amber
Lawn Fawn Dies: Stitched Heart, Cross Stitched Rectangle,
Sun, Cloud, and Ocean Waves
MFT: Cloud Stencil
Spectrum Noir Markers: DP1, DP2, and DP3
Imagine Crafts: Tear It Tape
Foam adhesive
Recollections Brand 110lb Cardstock: White 
Recollections Brand 65lb Cardstock: Purple, Medium Blue, and Yellow
Recollections Brand: Vellum
Accent Ultra Smooth 80lb Cardstock: White

I printed my image and sentiment onto white cardstock. I colored the image with my Spectrum Noir markers. I then used the could stencil with Tumbled Glass ink on the white cardstock. Next, I die cut the panel, add the stitched heart to the background.

Then, I die cut the waves from the blue cardstock and the vellum. 
along with the sun and cloud from yellow and white cardstock. I adhered the waves to the card front panel, the image of the boat. I used foam adhesive on the boat and sentiment.

I colored the heart in with Seedless Preserves ink and adhered the sun and cloud. Next, I adhered the front panel to the purple cardstock and then the card base.

Thank you for stopping by the blog today, I hope you found some inspiration!

Please join in on the fun at The Coffee Bean Challenge Blog and in the
 Facebook group Multi Crafters Craft Cafe

Sunday, February 09, 2020

At Sea For Two Valentines Day The Coffee Beans Feb 2020


Welcome Back Friends,

Robin here with the The Coffee Beans sharing one of the first digi stamp sets available for purchase from The Coffee Bean Stamping Machine located at the Multi Crafters Craft Cafe in Facebook. Click photos, albums. Coffee Bean Stamping Machine


I began by blending ink on the front of my card. After I was happy with my sky, I die cut some clouds, the wave and punched iut the hearts.

I colored the boat in with color pencils. I pop dotted the wave, adhered the boat behind the wave. Ink the edges of the clouds, pop dot those for added dimensions. Add the heart and the sentiment for two.

Thank You for visiting  and as always I appreciate your kind comments.

Until Next Time......

Robin