Showing posts with label digital stamp. Show all posts

Saturday, July 11, 2020

Hit The Road Jack Coffee Bean July 2020


Welcome Back Friends,

Robin here sharing my project for the Coffee Beans Blog for July. How cute is this VW Bus hand drawn by our very own Annie Collins??

I graduated high school in 1975, saying that to say, VW Buses were on the road! I never owned a VW till I married a VW lover, with a 1972 Super Beetle and a 1974 VW Thing. Always wanted a bus though.

I created my tag in the likeness of a VW bus I often seen on the streets of my home town!


                                               I hope you get to Hit The Road, Jack!

Thank for visiting and as always I appreciate your kind comments

Until Next Time...........

Robin

Friday, June 26, 2020

Wedding Card

Hello - Helle here with my last post as Design Team Member of the Coffee Beans Design Team.

I chose to make the lovely Wedding Cake that Anne Ingram designed and that you can find in the Etsy Store and the flowers are designed by Annie Collins.


This time I did a mixture of print and cut and coloring in the image.

The cake, background and the card are all print and cut - papers are from BoBunny's Digi collection "Country Garden" 

I used Promarkers to color in the flowers and used a Glitter Gelly Roll pen for the flower centers.

Finally I found a fun adhesive pearl swirl for the cake to give it that last WOW factor.

Thank you for visiting. Thank you to the Lady Beans/The Coffee Beans for having me on their team. I've really enjoyed my time here and will be following you on the sideline from now on.

Wednesday, June 03, 2020

Jesse Boy Bear

Father's Day is this Friday here in Denmark. It's the same day as our Constitution Day....figures ;-) 

Well all Dads deserve recognition for their devotion, love and hard work but sadly I lost my Dad several years ago, so I will have to make due with sending a loving thought to where ever he might be.

I might not get to send him this card but I made it anyhow….maybe it more fitting for my kids to give to their Dad but no matter what - I made for Father's Day :-)

I used the darling Jesse Boy Bear Digi Stamp from Bugaboo Stamps:


This time I used the same technique as last  - the Print and Cut function. I thought it would save me some time.....LOL....NOT!

If I choose to do this another time, I need to make sure I have the right patterned paper I want because I spent a lot of time searching for some but found this at Creative Fabrica.

I wanted a watercolor look - so it looks colored in. 


I also made the shaped card with  my Silhouette Cameo. Simply by making an Offset of the stamp, duplicate the offset and flip the duplicate horizontally. Then I overlap the two offsets, weld them together and make a scoreline down the middle. Very simple and easy.

I did not make a sentiment to put on the card - simply in case I choose to use it for something else.

Happy Father's Day to all Dads out there and thank you so much for stopping by.

Tuesday, June 02, 2020

Jesse Bear Celebrates Bonus Dad's Day

This cute little bear is named Jesse. He is a Digi stamp from Bugaboo Stamps Today Jesse is helping me celebrate Dad's Day for a special dad.  My real father passed away 23 years ago. I have Bonus Dad. He has been a great part of my mother's, my children's and my own life for the last 15 years. He has been very supportive for our lives. He has given much love to the family as if he always has been from the beginning.  The base is an A2 size card made from Whisper White card stock. Layered with Real Red and Whisper White and then Real Red again.  The last layer of Real Red was sprayed with Art Anthology's Colorations Spray in Gilded Gold to give it a little pop without girly glitter.  Jesse is colored with colored pencils in basic colors.  The sentiments were typed in word and printed out on Whisper White card stock since i really did not any stamp sets to commemorate Father's Day. Inside is a cute fun fold to make the sentiments pop that I just learned how to complete today.
The middle strip is 1 3/4 x 11 and score at 2 3/4 in, 5 1/2 in and 8 1/4 in.  Fold at the score lines to make a mountain fold.  Attach the strip to the bottom of the inside of the card right in the middle with strong adhesive.  then fold the strip down and add adhesive to the top portion of the folded strip.  Close the A2 size card to have the strip attach to the top. When you open the card, it becomes a pop up card.  The sentiments as I said before were hand typed by me, printed on Whisper White card stock and then cut out.  The Real Red backing for the sentiment are 2 1/4  in by 2 3/4 in.  I also sprayed them with the Colorations spray to give them a patterned look.  This card was very fun to make. Hope you enjoyed it as much as I did.  .

Tuesday, May 26, 2020

A little bit Outlandish

Hello all - Helle here with a new card project for the Coffee Beans Design Team.

This time I've done it a bit differently meaning that instead of coloring in a digi stamp, I've used the print and cut option in my Silhouette Studio Software. It's a bit more of a lazy approach but if you - like me - aren't the best with markers or crayons, it's a great alternative.

This time I used digi stamps made by our own Anne Ingram and Annie Collins. These stamps are available in the Lady Beans Etsy Store

I originally intended this to be a bridal project but when searching for digi paper to use, I came across this lovely paper by Lettering Delights - A Wee Bit Scottish and this of course refers to the TV series Outlander.

So this is what I came up with:

I pictured these to be Claire's shoes ;-)

The shoes are by Anne and the flowers are by Annie. 

I did use a Promarker for the center of the flowers + a Gelly Roll Pen with glitter.

The background is made with digi paper and a Celtic Knot Motif from the Silhouette Design Store ID #57808.

Finally I added a small sentiment written with a Celtic font.


I think it rather fun that you can use this method too. What do you think? Please let me know in a comment below.

Thanks for joining me today - hope to see you back here very soon.


Wedding Season Is Upon Us

The more elegant the wedding, the more elegant the cake.  This Digi file from Anne Ingram was sponged in Tim Holtz Distress Oxide Wilted Violet, Picked Raspberry, and Wild Honey Inks. The design on the cake is an image from Simon Says Stamp's Thankful Flowers stamp set, heat embossed in Caramel Cosmic Semi Transparent Embossing Powder from Sparkle and Sprinkle. Glitter Peel Off Stickers from Love from Lizi.  Sentiment from Simon Says Stamp's Congratulations stamp set, heat embossed in the same Caramel embossing powder.  The mats are gold mirror, peach colored, and designer card stock on top of Whisper White A2 card base.  Had a lot of fun making this card.  


Saturday, May 23, 2020

Everyone Knows How Much I Love Glitter

Hello all. Salima here with Judy Markowitz's infamous Alicorn.  Isn't he just beautiful.  I used rainbow colored Stampin Blends to color his main in the colors: Real Red, Pumpkin Pie, Mango Melody, Shaded Spruce, Seaside Spray and Blackberry Bliss.  His unicorn and front bangs are all glittered up with Nuvo Pure Sheen glitter: Glitter Diamond and Glitter Champagne. I cut a couple of curves in some scrap paper and used that to represent clouds with Impression Obsessions Rose colored hybrid dye ink.  Gold mirror paper is the matting for our image. Sentiment is from The Ton stamp set called Easy Expressions layered on Gold Mirror paper.  You know the shine from the glitter was not enough. I took my Spectrum Noir Sparkle marker and went over the main of Alicorn to make him shine just a little bit more. They don't call me the Glitter Queen for nothing! 
You can find Judy's Alicorn Digi Stamp here. 
Thank you for visiting. 


Tuesday, May 19, 2020

Pink Perfume


Hello all!

I am back with another craftroom Creation featuring Coffee Bean Design digital stamps, For my cards today I played with the perfume jars collection.


To start off you'll need to print your images out I recommend on card stock, I used 80 pound white card stock but you can use whatever you have. I find coloring relaxing so I choose to use my Copic markers to color in these images. I am working on improving my pink blends (RV/R) since I struggle with them a bit and practice makes progress.

Heart Jar: RV11, R83, R85, RV34, R59, W1, W3, W5
Tear Drop Jar: RV02, RV04, RV06, RV19, N2, N5,C7 C9

I find with the RV/R color family I need to use more colors to get the blend I want. I tried 3 and 4 marker blends and they work but I wasn't getting the depth I wanted. I added another marker to my blends and got much better dimension. I notice with the RV/R color family the lighter colors pick up  more of the darker color than with other color families. When coloring I went lightest to darkest then back out but didn't color over the previous area just blended out the edge. After my images were all colored I added details with my white gel pen and a small “kisses” stamp.


These images are easy to fussy cut out but even if it's not perfect just run a water based black marker along the edge to cover the white core of the paper and it will look perfect.


If you are anything like me you have plenty of pattern paper hanging out in you craftspace, so use it! I pulled out scraps from the “Me and You” collection by “Me And My Big Ideas” to created 3 cards, you can find the bonus card over on my blog. I cut my scraps down to make layers for an A2 card (4 ¼ by 5 ½ inches) and uses foam tape to pop up my colored jars. Once I had the placement for my heart jar I colored in a shadow on the pattern paper to ground it.

Using digital stamps along with pattern paper scraps is a great way to make easy beautiful cards. I hope you enjoyed these cards. If you want see more of my craft room creation you can follow me on social media @TheCraftBean.

Happy Crafting
Brandi M.
The Craft Bean


Sunday, May 10, 2020

May Flowers


Hello Coffee Bean Design fans!

My name is Brandi M. aka The Craft Bean and I have a couple craftroom creation to share with you. I got a chance to play with the super sweet daffodil digital stamp by Coffee Bean Designs.


I started out by printing the images on card stock I used a 80 pound card stock but you can use any card stock that works with your printer.

I love coloring and as soon as I saw these floral images my Copic makers called to me. I also think these are beautiful when water colored. You can check out my blog to see that. I used 3 color blends, coloring from lightest to darkest then back to get an even blend.


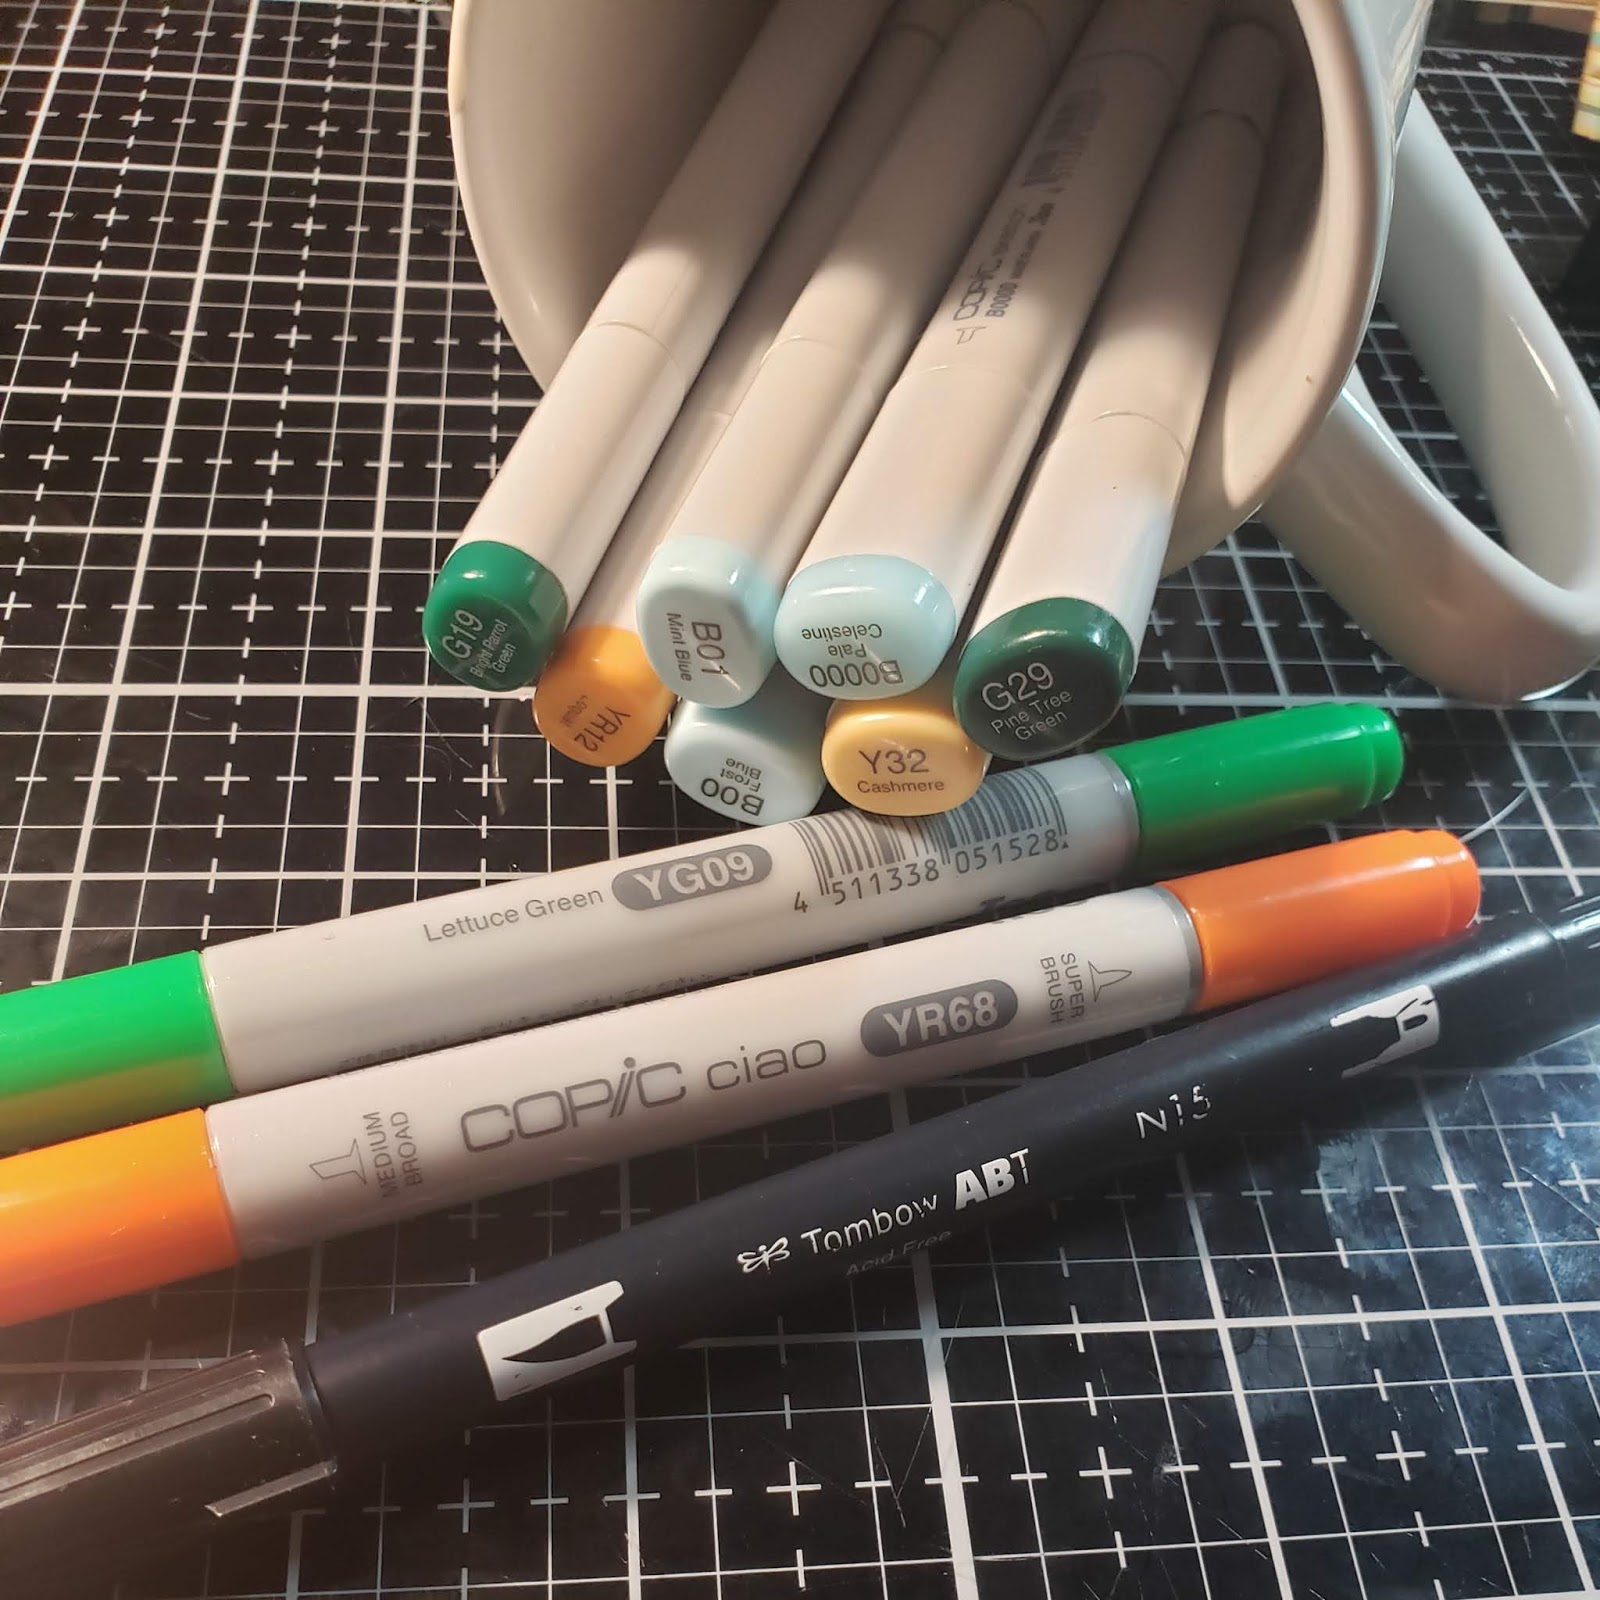
Copic Marker Combs:
Jar: B01, B00, B0000 Leaves:G19, G29, YG09 Flowers: YR68, YR12, Y32


Since I had two images colored I decide to make two card. I cut one piece of 8 ½ by 11 craft card stock in half to get two A2 card base (4 ¼ by 5 ½) For the first card I trimmed the flowers in the jar down (2 7/8 by 4 3/8) and matted it on yellow card stock and adding a “Hello Friend” sentiment for an older Tim Holtz set. Then went digging through my scrap bin and found a plaid pattern paper that coordinated with my color pallet. I trimmed my scrap down to 2 by 5 ½ inked the edges with brushed corduroy Distress Ink. I adhered my plaid paper along the edge of the card and then used fun foam to pop up my focal point.


For my second card I fussy cut the floral image and inked the edges with a black water base maker to pretend I cut it out perfectly. I used more of the plaid paper along the bottom 3rd of the card to ground my flowers and stamped “Thinking of You” from another Tim Holtz set. For my focal point I added foam tape to the back of the flower and Tombow glue to the steams to add more depth to this simple card.

Thank you for letting me share my craftroom creations with you all! I will be back soon with more to share. If you just can't wait you can head over to my blog for a bonus card. If you are inspired to create to create with this or another Coffee Bean Designs you can find them here. You can also find me all over social media @TheCraftBean.
Happy Crafting!

Brandi M.
The Craft Bean